The acoustics lab is equipped with an anechoic chamber, a Tascam DA-45HR DAT recorder, a Yamaha 03D digital mixer, a linux computer (zaunammer) with an S/PDIF sound card (Midiman/M-Audio Delta DIO 2496) which allows for digital recordings with a bit resolution up to 20 bit and a sampling rate up to 96 kHz, a NAD 302 analog stereo amplifier, several microphones, headsets, and headphones, as well as a laryngograph for recording glottal oscillations. It is also possible to record simultaneously on DAT cassettes and harddisk.
Please do not change any cables and please inform the administrator of the acoustic lab of any changes or observations you have made!
How to make recordings in the acoustics lab
Quick guide for the most common recording scenario
- Turn on the digital mixer and the amplifier above the Tascam DAT recorder. Choose setup
HFMREC (No. 46)on the digital Mixer by pressing the up and down keys on the upper right, withinScene Memory, and recall the defaults using theRECALLkey therein. - In the recording room: turn on the rack (where the headphone is attached to).
- Login to the Linux machine (host zaunammer) and start the mixer panel with
envy24control &in a shell.
The (four) sliders of the two rightmost channels,S/PDIF In LandS/PDIF In R, should be set to 0 dB (slider knobs at the uppermost end), and for each channel, bothMUTEbuttons should not be pressed.
Not doing so yields recordings in a somewhat lower volume, beware! - Go to a local directory (on the Linux machine) where you want to save the recordings and start the recording with the command
arecord -r 48000 -f S16_LE -c 1 outfile.wav
The-f datsetting won't work as it expects stereo input.
Detailed description of the recording procedure
Today, there is only one option for making recordings, which is the digital mixer (Yamaha O3D). All cables to the anechoic chamber are connected to the digital mixer; making recordings with another setup (e.g. the old analog one) is deprecated and requires extensive setup.
Inside the recording room the MIC 1 (Auf.R. Mic at the mixer) cable must be attached to the microphone used for recordings, usually the small head-mounted microphone. Also make sure that the rack where the headphone is connected to is switched on in the recording room (on/off switch at the right front side), and that neither L MUTE, R MUTE, nor MONO are turned on.
Recordings are done as follows:
- Turn on the digital mixer (Yamaha 03D): at the right backside is a button located which you have to press. The startup of the mixer is signaled on the LCD display on it. After the boot process has finished press the up and down keys in the
SCENE MEMORYarea on the mixer to select the setupHFMREC (No. 46)and the mixer settings will be automatically adjusted for you. If there is a small sign sayingEDITbelow the setup name, pressRECALLin theSCENE MEMORYarea to recall the defaults. Unless you need more specific adjustments this setting should be sufficient for most of the recording scenarios (48 kHz, 16 Bit, 1 channel).
There is also a setting for recording acoustic and glottal (LX) signals simultaneously, which isNo. 48 Lx Record, and a DAT to harddisk transfer setting,No. 49 DAT → PC.
The digital output of the mixer is connected to the digital input at the soundcard (COAX, optical being unused), and the TASCAM DAT recorder. Unless you want to record on DAT tape as well you may skip the next paragraph. - Turn on the Tascam DAT recorder and insert a DAT tape. Check the settings of the switches on the recorder:
- CLOCK: this adjusts the syncronisation source for digital recordings; since the Tascam recorder receives the sync signal from the digital mixer this switch has to in position D-IN.
- RECORD MODE: this switch adjusts the bit resolution and should be in standard position for 16 bit recordings (which is the default setup). If you want to record with 24 bit resolution this switch has to be shifted to HR(24BIT), but also other adjustments on the digital mixer are necessary to receive also a 24 bit signal as input, so the
STANDARDsetting is usually fine. - Fs: Sampling frequency has to be on 48k for a 48000 Hz sampling frequency wich is the frequency of the incoming digital signal.
- INPUT: Since the input signal is digital this switch has to be on DIGITAL.
- DIGITAL INPUT: the DAT-recorder receives the digital signal via the AES/EBU interface and therefore the switch has to be in position AES/EBU.
RECORDandPLAYbuttons simultaneously; hold them for a little while until the recording starts. When you are using the DAT-tape for the first time it will be formatted by the recorder which is indicated by a Formatting-sign on the user interface. Sometimes this does not work. Try to rewind the tape to the very beginning. Check the recording levels and make sure that it never crosses the 0 decibel limit.
Alternatively, you can put the recorder into record standby mode by pressingRECORDandPAUSEsimultaneously and starting the very recording by pressingPLAY.
When recording only on DAT tape you can ignore the following: - Log in to the Linux computer and check where there is enough disk space for your recordings, either in
/tmpor in/fs/aufnahmebereich. Make sure that you are recording to a local partition on the computer; saving recorded sounds directly to NFS-partitions on other computers is not advisable since the transfer rate over the network might not always be constant, which will almost certainly result in faulty recordings. Check the local disk space with the commanddf -hwhich prints you out the amount of available disk space on the individual partitions. - On the Linux computer, start the graphical mixer with the command
envy24control &.
Check a) in theMonitor mixertab that theS/PDIF L/Rchannels are unmuted and that their faders are positioned topmost, indicating 0dB reduction, and that b) in theHardware Settingstab the input clock source is set toS/PDIF in.
- Go to the directory where you want to save the recordings and start the recording with the command
arecord -r 48000 -f S16_LE -c 1 outfile.wav
This will create a soundfileoutfile.wavwith 48 kHz, 16 bit resolution, and 1 channel. To stop the recording press CONTROL-C. We suggest to use this fixed bit rate and fixed sampling frequency for best results. Although it is possible to record with other sampling frequencies and resolutions the digital signal comming from the digital mixer is in this format (48 kHz, 16 Bit) and therefore no other effects can interfere. Downsampling of an 48 kHz recording to 16 kHz is simply done by using an adequate program like sfconvert (on SGI/IRIX) or sox (on Linux), e.g.:
sox -V infile.wav -r16000 outfile.wav resample -ql
It is advisible to make a test recording and check its quality with a signal editing program (xwaves, wavesurfer) before starting the actual recording. You may simply listen to the recording by using theaplayprogram. When you want to listen to recordings make sure to turn up the channels 5 and 6 on the mixer (use slider 5 or 6, both are ganged) on the digital mixer and that the button labeledTape 2on the stereo amplifier is pressed (and that the buttonTape 1 Monitoris NOT pressed!).
If you want to estimate the disc space needed by your recordings the following table might help:
| Bits | Sampling Freq. | # channels | Bitrate [kbit/sec] | Bitrate [kbyte/sec] | Disc space for 1 minute |
|---|---|---|---|---|---|
| 16 | 16 | 1 | 256 | 32 | 1.9 MB |
| 16 | 48 | 1 | 768 | 96 | 5.7 MB |
| 24 | 48 | 1 | 1152 | 144 | 8.6 MB |
How to transfer recordings from DAT cassettes to hard disk
Read the DAT transfer tutorial on this issue.
Further Information
- Some notes on
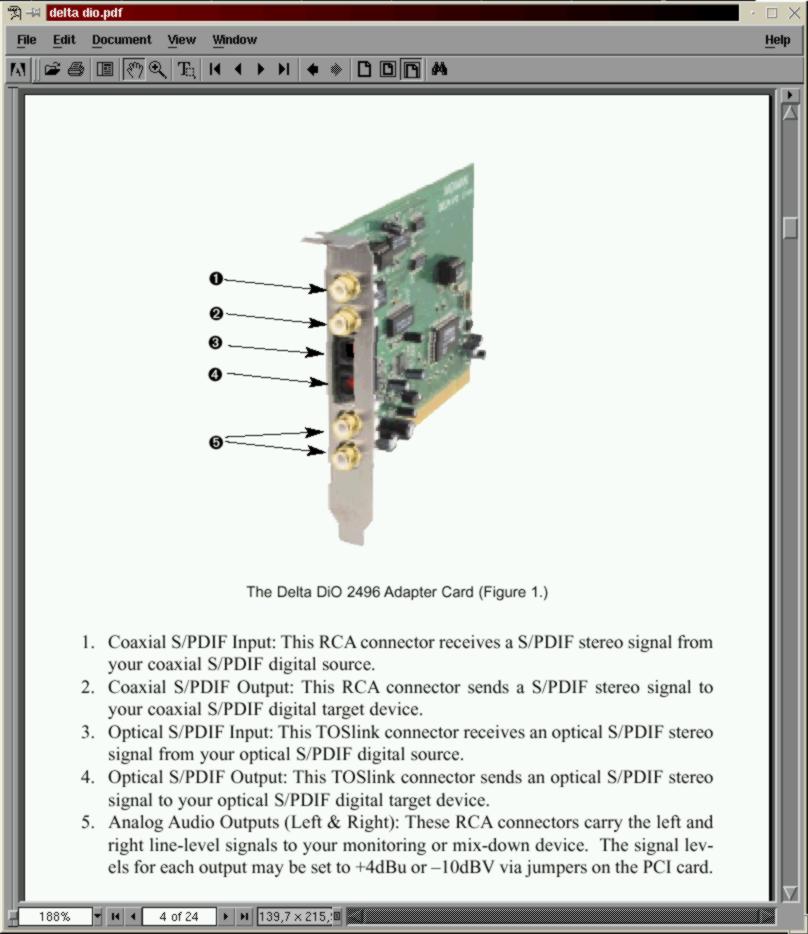
envy24control. - If you want to identify the individual plugs on the soundcard you may look at a picture of the DIO2496 sound card.
- For further information about the soundcard see the sound card M-Audio Delta DIO 2496 manual in PDF format.
- For further information about the Tascam DAT recorder see the TASCAM DA-45HR DAT recorder manual, also in PDF format.
- For specific questions and the according answers see the FAQ - Frequently Asked Questions
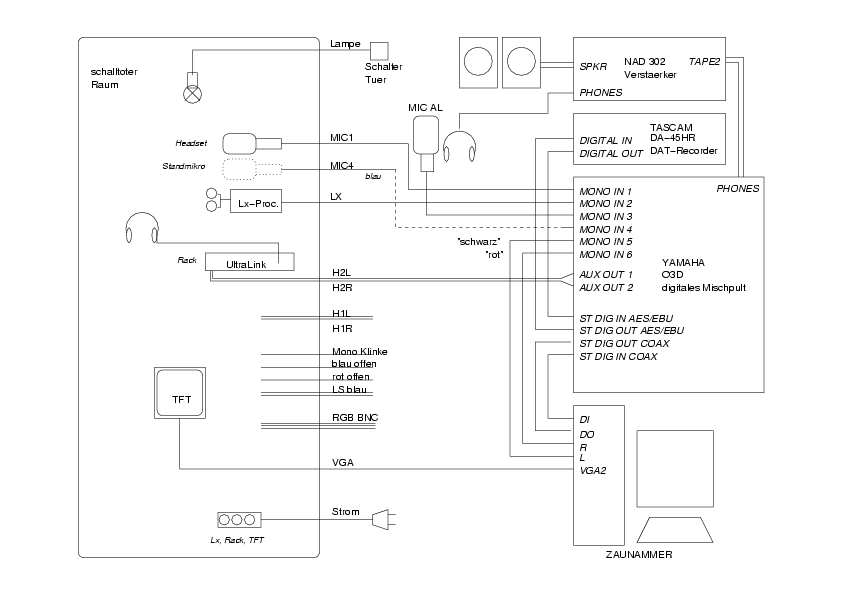
- Plan of the cable connections in the acoustics lab
- On line documentation of the tools:
man <TOOL>, forsfconvert,sox,arecord, andaplay.
If you need more information you may send an Email to akustiklabor-admin
Last changes: 2004-08-04, ManuK
Please note that this tutorial is only a preliminary version; a more detailed one with a concise description of what has to be taken care of is in preparation. This new tutorial will also cover simultaneous recording of Lx signals. And, not to be forgotten, one day the USER DEFINE buttons of the digital mixer will again serve as shortcuts to the appropriate recording presets, as they used to...